Jump to content

Recommended Posts

Dear Arma community,


I'd like to share some of my knowledge regarding the ACE3 Sniper mechanism here. I know there's been lotta ACE3 Sniper Tutorial or Guide out there and you guys probably have been playing as ACE3 sniper for long time. But i just wanna highlight some important things that have always been forgotten by the players when they play as snipers which hinders the precision shots to be delivered. Yes, some players are still doing it wrong and their shots tend to fly too high or too low off the target :( #NoOffense Therefore, i'm trying to give you some easy instructional steps on how to play as a professional ACE3 Sniper and shoot like Real Military Sniper in Arma 3. If there's something needs to be added, changed, or fixed, just let me know.


The steps written in Blue are the things the players most likely already know. And the steps written in Red are the things the players usually keep forgetting


Alright then, let's get it started now!

To become a badass ACE3 Sniper, all you gotta do is follow these 12 Easy Steps:


1. Determine what kinda battle you’re going to engage & what type of shot you’re gonna take:

         a. MTE (Multiple Target Engagement) this really requires fast shooting at many moving targets. “One shot one kill” shooting & Long Range Shot are not really a neccessity so Precision & Accuracy are usually less required.   

         b. HVT (High Valuable Target) assasination → this really requires “one shot one kill” shooting! Mostly Medium & Long Range Shot are required. Precision & Accuracy are really required!

         c. HC (Hostage Crisis) this really requires “one shot one kill” shooting! Short Range Shot are required (100 m below). Precision & Accuracy are really required!


2. After that, you conduct a Loadout Selection correspondig to the type of battle you’re gonna engage. While choosing a weapon, you must focus on its Precision Level (Shot Group/Shot Dispersion), Accuracy Level, Maximum Effective Range, Rate of Fire, & Damage (it must fit the type of shooting you’re gonna take). You have to do some thorough analysis on the rifles & bullet you're going to use! You always gotta measure rifle true performance by analyzing their shot-group (shot dispersion)!


In Sniper World, Precision & Accuracy really matter a lot >_< Precision & Accuracy will greatly affect the Probability of Hit.  

You gotta understand what Precision & Accuracy really mean. The Precision & Accuracy of your loadout will totally affect your shots.


There are Types of Rifles (based on their Precision level) which you can choose:

1)    Benchrest Rifle --> Shot Group / Shot Dispersion / Extreme Spread size is about 0 MoA - 0.23 MoA (0.00 inch - 0.23 inch at 100 yard)  --> this rifle is extremely very accurate! :) it's good for HVT, HC, & MTE shot.

2)    Precision Rifle --> Shot Group / Shot Dispersion / Extreme Spread size is about 0.25 MoA - 0.76 MoA (0.25 inch - 0.76 inch at 100 yard) --> this rifle is very accurate! :) it's good for HVT, HC, & MTE shot.

3)    Sniper Rifle --> Shot Group / Shot Dispersion / Extreme Spread size is about 1.00 MoA - 1.53 MoA (1.00 inch - 1.53 inch at 100 yard) --> this rifle is accurate! :) it's good for HVT, HC, & MTE shot.

4)    Designated Marksman Rifle --> Shot Group / Shot Dispersion / Extreme Spread size is about 1.78 MoA - 2.30 MoA (1.78 inch - 2.30 inch at 100 yard) --> this rifle is pretty accurate but not good for precision shooting! :( it's good only for MTE shot.

5)    Assault/Battle Rifle --> Shot Group / Shot Dispersion / Extreme Spread size is bigger than 2.54 MoA (2.54 inch at 100 yard) --> this rifle is not accurate & not suitable for precision shooting at all! :( it's good only for MTE shot.


Benchrest, Precision, & Sniper Rifles have small/tight shot dispersion which gives them much higher probability of hitting the target.


Here's the example of Precision Rifle (with High Accuracy & Long Range Capability) in Arma 3:


v8PNzybAaY4XD9Bl4EH-a_QSlBM3jDCj4DjaW36e                BeVY3QnvfWtDIwbK7WwAs3SeRffxLc3N8wGPUiRf             tEfcRyygaJ_3lJpPFVCe9e79FTvc2GSmTVq5ONU-


As you can see in those pictures above, M40A5 rifle (from Dagger mod) is insanely very accurate! At 100 m (its zero range), the 40-shot group size is very small. At 850 m (its max effective range), the 40-shot group size is still relatively small too. 

This is the type of rifle you wanna use to snipe in Arma 3!


Here the things which are gonna affect your Loadout Precision & Accuracy (you gotta consider these while selecting a loadout):

         aCartridge & Caliber Selection

             - 5.56x45mm Nato (.224 cal)  for short range (100 – 400 m), has small damage (more like varmint hunting cartridge, it takes couple of shots to kill a man). It’s more like a battle-rifle cartridge but some soldiers use it as designated marksman cartridge.

             - 7.62x51mm Nato (.308 cal)  for medium range (500  – 800 m), has pretty huge damage (can kill a man in one shot). it fits the MTE, HVT, & HC shot.

             - 300 Win Mag (.308 cal)  for long range (900 – 1100 m), has huge damage. It fits MTE & HVT shot, but not the HC shot (coz it could hurt the hostage as well)

             - 338 Lapua Magnum (.338 cal), 50 BMG (.510 cal)  for extreme long range (1200 – 1600 m), has very huge damage. It fits HVT shot, but not the HC shot (coz it could hurt the hostage as well) and not the MTE shot (coz the cartridge is too heavy and the recoil is hard to control)

             - 375 CheyTac (.375 cal), 408 CheyTac (.408 cal)  for super extreme long range (beyond 1600 m), has very huge damage. It fits HVT shot, but not the HC shot (coz it could hurt the hostage as well) and not the MTE shot (coz the cartridge is too heavy and the recoil is hard to control)

          bAction Selection

              - Bolt Action Rifle it mostly offers more precision and accuracy but it definitely lacks of Speed & Rate of Fire. This obviously fits HVT & HC shot!

              - Semi-Auto Rifle it definitely offers more Speed & Rate of Fire but it usually lacks of precision & accuracy. This obviously fits MTE shot!

          c. Barrel Selection, Stock Selection, Trigger Selection → choose whatever gives you more precision & accuracy (these actually don’t matter in Arma 3 coz they come within the rifle so you can’t really costumize them, but they really matter in real life!)

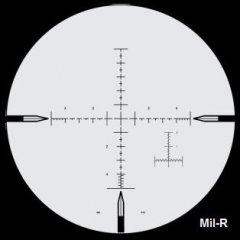
          d. Scope Selection pick High-Power scope for HVT & HC shot, pick Low-Power scope for MTE shot! Always use scope with Miliradian-based reticle (dont use duplex reticle coz it’s useless)! Scope with Miliradian Ballistics reticle (like Horus reticle) is even better coz you can use it to Mildot Holdover all the time very easily (no need to dial the adjutment at all). RHS Mk4 M5 scope (from RHS mod) has Horus H58 reticle which allows you to do Mildot Holdover fast without ever needing to dial at all. And Make sure the scope is perfectly zeroed at 100 m!

          e. Attachment Selection Bipod & Muzzle brake is a must for Precision & Accuracy! Bipod will steady your aim & Muzzle Brake will reduce the recoil. Suppressor is optional (use it when you need to stay stealthy).

          fAmmo selection choose some Match-grade ammo (which has high Ballistics Coefficient, optimal Muzzle Velocity, & awesome Ballistics performance)! Make sure you really got the right ammo magazine loaded in the rifle receiver! Coz sometimes players mistakenly load their rifles with the wrong/different ammo (still thinking it’s the right ammo), shoot it, & then the shot trajectory becomes completely different lol XD


3Always equip yourself with AtragMX (a Ballistics Calculator), Kestrel 4500 (a pocket weather tracker), & Laser Range Finder → These 3 items are very important to calculate the firing solution! Without them, you guys will never be able to shoot long range accurately. So always carry these 3 items in your vest or in your backpack!!!


m6cPCBufzaFzRu-5SwwFZ5PziSsfgsWhsXMbrCL7                           640daKyKkzutG1IollIx30vTKlqmhloQ93UaA8cT                     ntN2I6PWrqscnSabgTujoVNpxVt7otT7sRpvUzPz        


4. Zero your Rifle at 100 m and confirm the true 100 m Zero (make sure no offset at all!) Spawn a target at 100 m and take couple of shots at it. You’ll see your shots are low or high. Yup ACE3 100 m zero is always 0.3 Mil – 0.5 Mil low or high (depends on your current loadout) so you gotta make an adjustment for your 100 m zero by dialing 0.3 Mil – 0.5 Mil up or down and then set it as a new 100 m zero. Do this through ACE Self-Intercation menu (Click & Hold the “Left CTRL + Windows” key, drag your mouse to the “Equipment”, then to the “Set Zero Adjustment”). You gotta make sure your 100 m zero is really spot on (not high or low at all)! After doing that, i guarantee your 100 m zero will become really spot on! Lotta ACE3 players don’t do this which always causes their shots to become low or high >_< Why you gotta zero your rifle at 100 m (not at other distance)? coz 100 m zero is easy to do & very stable!


o8L_Jki-WCpqk_ukHLlcry0WgFNb-Mi2HKpnrlBy UWyJ5OSOVngKi5dAxPGa5UlGlSn1yIZ7WD_Yq8Qw     j5VevPyaK1Y4zPnSSWLJ3N1BZ4RUNkIDl0eykNt7


5. Measure the True Muzzle Velocity using the “Chronograph” or calculate it yourself → in Arma 3 you can use a "Chronograph" by spawning a Steel Target right in front you (at 0 m), shoot it directly and it’ll tell your remaining velocity! You always gotta measure the True Muzzle Velocity coz your Muzzle Velocity is always changing corresponding to Powder Burn Rate, Temperature shift, and the Barrel Length. Plugging the wrong Muzzle Velocity into the AtragMX will always give you wrong firing solution & cause your shots to be low or high off the target >_<


7WfEtr1aAcO9rEEUHkPpZuCVaFsZPfaLQwIObWbk ---------------->   iFoioBDBISJ0UN9G3gQvTAL6wjXsYBFADqejJj6M

Shooting my rifle directly in front of a Steel Target will inform me about its Remaining Velocity (which is the true Muzzle Velocity) ^_^


this "Chronograph" is actually an exclusive feature in "360 Degree Training Course" mod created by Ruthberg (the Author of ACE3 Advanced Ballistics).


If you really can’t measure the true Muzzle Velocity with that “Chronograph”, then you gotta find it by asking the Weapon Mod Author or using the Config Viewer in Eden Editor!

Config Viewer will help you find the Muzzle Velocity. But the Muzzle Velocity you see in the Config Viewer is actually the basic MV (it only applies at 21°C)Don't forget that MV is constantly changing corresponding to Air Temperature!!! So at other temperatures higher than 21°C, the MV will shift higher than the basic MV (+1.5 mps per 1°C shift). At other temperatures lower than 21°C, the MV will shift lower than the basic MV (-1.5 mps per 1°C shift).

So you still gotta calculate the True Muzzle Velocity yourself with this table:


Muzzle Velocity Shift

-26.55 mps

-25.47 mps

-22.9 mps

-20.12 mps

-16.98 mps

-12.8 mps

-7.64 mps

-1.53 mps

+ 6.0 mps

+15.2 mps

+26.2 mps

Powder & Air Temperature

-15 °C

-10°C

-5°C

0°C

5°C

10° C

15 °C

20 °C

25 °C

30 °C

35 °C


Note: The basic air temperature for the basic MV of all Arma 3 weapon is always 21 °C! So when the air temp is cooler or hotter than 21 °C, your MV will always shifts (as described in the table above). The average MV change (due to the temperature) in ACE3 is +/- 1.5 mps per 1°C shift. And the average MV change (due to the Added Barrel Length) is +/- 10 mps per 1 inch added barrel length.


For example:

You’re shooting an M24 SWS rifle (24” barrel length) loaded with M118LR ammo. The mod author of that weapon or the Eden Config Viewer said the basic MV is 790 mps (it only applies at 21 °C). While your current air temp is 30 °C. It means your current MV will certainly be

=  790 mps + 15.2 mps = 805.2 mps.

And if you load the same M118LR ammo into the M40A5 rile (25” barrel length), your MV will be approximately = 805.2 mps + 10 mps = 815.2 mps 


6. Plug all your Rifle & Ammo Data into Ballistics Calculator (AtragMX or whatever you use) you gotta get all these ballistics data of your Loadout from the mod author of the weapon or you can just google it! To bring up the AtragMX, you click “Pause/Break” key. Then you select the “GunList” at the bottom left corner of your AtragMX screen. Then you select “Add New Gun”. Then Add a “New Gun Name”. Then you go to the “Gun” tab in the AtragMX. Then you select M (Metric unit) at the top right corner. And then you plug-in all these things:

         a. Muzzle Velocity you plug the True MV that you just measure through the “Chronograph” before! Remember MV is always constantly changing depending on the Air Temperature & Barrel Length!!!

         b. Ballistics Coefficient ask the mod author or just use the config file viewer in the EDEN Editor! (AtragMX only works with G1 BC! If you got G7 BC, you gotta convert it first to G1 BC)

         c. Bullet Caliber/Diameter ask the mod author or just use the config file viewer in the EDEN Editor!

         d. Bullet Length & Twist Rate ask the mod author or just use the config file viewer in the EDEN Editor!

         e. Bullet Mass ask the mod author or just use the config file viewer in the EDEN Editor!

         f. Scope Height ACE3 scope height is always 3.81 cm / 1.5 inch

         g. Zero Range  always plug 100 m!


fwVIr3rkMbexUnR7l7nviFKn-Qgdm4Wz-ixggxXB   ------------>  EQc_tcYPTQGi_jwDkal_l9vOF7ZQLkh1U3UFQkcn


7Measure the Atmospheric Condition using the Kestrel 4500 and plug the data into Ballistics Calculator (AtragMX or whatever you use) → To open Kestrel 4500 for the first time, click Scroll Lock, then press the down arrow to switch it to the “Atmosphere” page. It’ll show you these 3 things which you gotta plug into the AtragMX:

          a. Air Pressure → in hPa

          b. Air Temperature → in °C

          c. Humidity → in %

Remember this atmospheric condition is always changing all the time so you better always monitor it with the Kestrel 4500! To keep the Kestrel 4500 opened all the time, click “Left Shift + Scroll Lock”! It’ll show up at the left bottom of your screen permanently. Yup, you can easily keep track of the Atmospheric Condition by letting the Kestrel stay open like that. Click the Atmosphere tab in the AtragMX, then select “TBH”, and then enter those 3 things into the AtragMX!


e6g-D7tMp4LdIkp4-Q3gUTK9RAgN3BjJVUV42VRU  ----------------> 32iO_9eluzVpTE98hWhRaY3icI6Z1hFVFM1tseYe   ---------------->  4HjF_rZM2Eff7RE2Xpy5a1prOJ6u6Myg9089w-As


8Plug all the Target Data into Ballistics Calculator (AtragMX or whatever you use)! Plug them all in the “Target” tab in AtragMX:

          a. Range find it with Laser Range Finder (click “B” key and aim it at the target)

          b. Angle of Firing for uphill and downhill shooting, measure it with the Protractor (click “Left CTRL + Left Shift + K” key)

          c. Target Speed & Direction for moving target

          d. Latitude & Azimuth → For calculating the Coriolis Effect. Find the Azimuth with the compass (click “K). The latitude for all common Arma 3 maps can be found in here


          e. Wind Speed & Direction there are 2 ways to measure the Wind:

              -  Using the Wind Arrow

                 click “Left Shift + K” key to bring up the Wind Arrow. The Wind Arrow will show up at the upper left corner of your screen. It’ll show you where the wind actually blows. If the Wind Arrow is pointing to your right, it means the Wind is blowing to the right and your bullet trajectory will drift to the right. If the Wind Arrow is pointing to your left, it means the Wind is blowing to the left and your bullet trajectory will drift to the right. If the arrow turns out to be a White Circle, then it means  there’s no wind at all. The Wind Arrow also shows you some different colors indicating different Wind Speeds (white = 1 mph ; very light green = 3 mph; light green = 5 mph ; green = 10 mph ; darker green = 20 mph ; yellow = 25 mph) based on Beaufort scale. Don't forget to convert the number from mph to m/s coz AtragMX can only use m/s!


For Example:

c34Zi4ksuTHaFQfBecadCf2B6aIPSZAyTtcWzQlH     -----------> 3 mph - 8 mph Wind coming from 10 o'clock to 4 o'clock (Blowing from left to right)


               - Using the Kestrel 4500

                 Click “Scroll Lock” to bring up the Kestrel. Then click its down arrow button to switch from the “Atmosphere” page to the “Wind Speed” page. It’ll show you the wind speed (but that’s not the true wind speed you’re currently dealing with yet!). To get the real wind speed, you gotta have your Kestrel 4500 facing the wind directly! Click Left Shift + Scroll Lock to let the Kestrel stay open (it’ll show up permanently at bottom left corner), then you face the direction where the wind comes from. By doing that, the Kestrel 4500 will show the real wind speed. Here’s exactly how you do it . 


After getting the Wind Speed & Direction, you plug the data in the AtragMX to calculate its Windage value.


ZdSzFxon-FB-POrYhwmxYQb2jj8R4b2Mpig38dED


Remember! Windage is very tricky, my friend!


There are 2 types of Wind you gotta plug in AtragMX.

1. "Uprange Wind"Wind at shooter's position (Wind that blows only around the shooter)

2. "Downrange Wind"Wind all the way to target's position (Wind that blows between the shooter & the target)


 The Wind data that you got from Kestrel 4500 is actually an "Uprange Wind" coz that wind most likely blows only near you. You can only measure "Downrange Wind" with Mirage Reading (which is really hard to do in Arma 3).

It means you can't really trust the Kestrel 4500 to measure the actual Wind Speed coz the Kestrel 4500 only measure the Uprange Wind :( Kestrel 4500 can't measure the Downrange Wind. So You also gotta pay attention to the Wind Arrow & the Mirage to measure the actual Downrange Wind. It's really hard to read them but if you practice a lot, you'll get the hang of it ;)


Sometimes Uprange Wind could be equally the same as the Downrange Wind, but only when the map contour is perfectly flat (not mountainous at all)! If you're shooting in a mountainous area, the Uprange Wind & the Downrange Wind will always be different so be careful.


Here's some trick to estimate Downrange Wind:

1yBuI1U1k0JobbO8gfG81GprBaMsq9hg2rGmxPv-


After finding the Uprange & Downrange Wind, you gotta plug them both into the AtragMX!

You may notice that in the “Target” tab in AtragMX, there are two gaps or squares to fill in Wind Speed. You better plug your Uprange Wind data (from Kestrel) into the gap/square number 1 (the left one) in the "Target" tab in AtragMX.

And you plug the Downrange Wind data into the gap/square number 2 (the right one) in the "Target" tab in AtragMX

Gap/Square number 1(the left one) is for "Uprange Wind" and Gap/Square number 2 (the right one) is for "Downrange Wind".


After getting all the Target Data, you gotta plug them all into the Target tab! Then the AtragMX will give you the final Firing Solution.


Here's the Official Manual of Horus AtragMX.

Here's the AtragMX tutorial by ACE3 team.


tbw7R64uHO1t8XX2tGA833P3rPxAbT0WoNUs27uk ----------> HDxfLTeCdbv4nRpTNWmqJ4DzrzNWBTMSl7SGIVju  ---------->  Gz00VKvGQhy6z_hBPRdqaNJ5h8x-58ynIrcF-qUS


Or you can actually do the Todd Hodnett “Quick Windage Formula” instead of plugging the wind data in the AtragMX (yup it works! I always do this all the time coz it's much faster than using the AtragMX!) ^_^


9Plug the Firing Solution onto your Scope! → To compensate for Bullet Drop, Spin Drift, & Wind Drift, there are 2 things you can do :

    a. Dial the Scope Adjustment click the "Up Arrow (↑)" and "Down Arrow (↓)" key for Bullet Drop. click the "Left Arrow ()" and "Right Arrow ()" key for Wind Drift and Spin Drift


bItfoAPT9UdqWN2vDS44YpCxjkZKPaD73PZDRUqk


But I strongly suggest you to NEVER dial for the Wind Drift coz wind is constantly changing all the time, so always use Mildot Holdover for the Wind Drift! I highly recommend you to use Todd Hodnett Quick Windage formula to calculate the Wind Drift fast without even using any ballistics calculator ;)


    b. you can do the “Mildot Holdover” → use the mildot to hold over the target for Bullet Drop & Wind Drift compensation without dialing the scope adjustment at all.


Remember that AtragMX always spits out the Firing Solution in Miliradian! ACE3 scope adjustment is always in Miliradian! Arma 3 scope reticles are mostly Miliradian based reticles (Mildot)!

So what is Miliradian? Miliradian is actualy a sniper's angular measurement.

1 Miliradian = 0.0572958° 

1 Miliradian = 10 cm at 100 m

1 Miliradian = 1 m at 1 km 


10Always go Prone (click “Z’ key) to stabilize your aim and always Deploy a Bipod (click “C” key) to rest your rifle on it to reduce the scope sway significantly.


tSXlQtq1_cfX1l51-K8nqI0_5lm85kfDrKJqQhEK


11.  Make sure the Scope Sway has been reduced so the reticle & the rifle aren’t moving at all when you take the shot. If it still moves a bit, you can hold a breath by holding the right mouse button before taking the shot.


12. Take the shot (click Left Mouse Button really gently) and see the Point of Impact. If it’s still off the Point of Aim, then you gotta re-adjust your weapon system and do follow-up shot fast before the target runs away.


Here’s my Arma 3 ACE3 Sniper Tutorial video in which i’m demonstrating all these easy 12 steps in less than 8 minutes:


ARMA 3 ACE3 SNIPER TUTORIAL (VERY QUICK, SIMPLE, & EASY 12 STEPS)

PLEASE TURN ON THE SUBTITLE! Coz there's no audible commentary in that video :(


you guys notice all my shots land perfectly on that Steel Plate target, right? Not low or not high at all! Just perfectly dead on! \m/

Now that’s how you should snipe in Arma 3 (ACE3) from this moment on! Now it's all about ONE SHOT ONE KILL!


Here's also some very nice tutorial pdf from QuickDagger (the author of Dagger Sniper Mod) → https://drive.google.com/open?id=1PWnTQRX-1NdpHFc2803mp5FbtCPykCZt


Does my tutorial really work for live operative mission??? Does being a sniper really work in this simulator??? Will it be effective??? 

Just check out this video showing how effective this tutorial really is!!!


ARMA 3 SNIPER KILLING SPREE / KILLSTREAK (1 SNIPER VS 29 INFANTRIES)


In this video, i'm on a killing spree / killstreak during an operative mission. I kill 29 enemy troopers from a far away quickly, easily, & stealthily. They don't even know where i'm at :)


ARMA 3 SNIPER KILLING SPREE / KILLSTREAK (1 SNIPER VS 100 INSURGENTS)


In this video, i'm on a killing spree / killstreak during an operative mission. I kill 100 enemy troopers from a far away quickly, easily, & stealthily. They try to return fire but they all get killed ;)


ARMA 3 SNIPE A TARGET IN HIS MOVING CAR (SHOOT THROUGH WINDSHIELD)


In this video, i'm shooting an enemy sitting in his moving car. I shoot him through the Windshield of his car. Yup, you can't run from a sniper! You'll just die tired :)


"POINT OF IMPACT" (ARMA 3 SNIPER MONTAGE)


this is my sniper montage video that shows how effective this tutorial really is!


"DEAD ZERO" (ARMA 3 SNIPER MONTAGE)


this is my sniper montage video that shows how effective this tutorial really is!


here's my youtube channel: https://www.youtube.com/channel/UCx6ZpuRmlNlAhAgha9zthbw


here's my analysis on World Records for the longest sniper kill shot.


----------------------------------------------------------------------------------------------------------------------------------------------------------------------------------------------------------------------------------------------------------------------------------------------------------------------


Thank you all for tuning in :) I hope this tutorial will help you become a better ACE3 Sniper ;) 

If there's something needs to be added, changed, or fixed, just let me know here.


Please share the knowledge with others because knowing is half the battle!


Good shooting!

-Best Sniper Simulator-

  • Like 7
  • Thanks 2

Share this post


Link to post
Share on other sites

This is awesome, thank you. 

You're right too, while I knew most of that there were some bits in the red that I'd forgotten 

  • Like 1

Share this post


Link to post
Share on other sites
On 22/6/2017 at 6:57 AM, JD Wang said:

This is awesome, thank you. 

You're right too, while I knew most of that there were some bits in the red that I'd forgotten 


Thanks for the feedback, mate! ^_^ Does this tutorial work for you and everybody else here? is there something else need to be added, changed, or fixed? Please feel free to leave comments in this thread :) Let's make this thread as an ACE3 Sniper/Marksman thread where we can share all our knowledge & information :)


---------------------------------------------------------------------------------------------------------------------------------------------------------------------------------------------------------------------------------------------------------------------------------------------------


If you guys already get the hang of this basic sniper tutorial, i highly suggest you all to start learning these Advanced Military Sniper Techniques:


1. Quick Windage Formula

this military sniper technique is called "Todd Hodnett Quick Windage Formula" which can be used in Arma 3 (especially with ACE3 mod). This technique was made by a famous gun instructor named Todd Hodnett. It has been used by military snipers (especially USMC, Navy Seal, & US Army) to calculate the windage/wind hold very fast without even using any ballistics calculator. You can use this formula for any kind of projectile/ammo (but you have to adjust it depending on the BC)!


here's the easy & simple windage formula:


EWN8CHxejdsFiXjFTrpJydSH9U0wmBfPBT7fQlqs


"Wind Speed" is the FINAL VALUE of wind speed (not its real speed) after taking Wind Direction into account!


"BC 1st decimal number" is the 1st decimal number of your Ballistics Coefficient 

0.2xx BC → 2

0.3xx BC → 3

0.4xx BC → 4

0.5xx BC → 5

0.6xx BC → 6 

0.7xx BC → 7

0.8xx BC → 8 

0.9xx BC → 9

1.xxx BC → 10 

so on


"Target Range converted to Miliradian" is the conversion of the target range into miliradian:
100 m = 0.1 mil 
200 m = 0.2 mil
300 m = 0.3 mil
400 m = 0.4 mil
500 m = 0.5 mil
600 m = 0.7 mil → adding 0.1 mil due to velocity bleed off (depending on the BC though) 
700 m = 0.8 mil
800 m = 0.9 mil
900 m = 1.0 mil
1000 m = 1.1 mil
so on


Keep in mind that there are 2 types of Wind:

1. "Uprange Wind" → Wind at shooter's position (Wind that blows only around the shooter)

2. "Downrange Wind" → Wind all the way to target's position (Wind that blows between the shooter & the target)


The Wind data that you got from Kestrel 4500 is actually an "Uprange Wind" coz that wind most likely blows only near you. You can only measure "Downrange Wind" with Mirage Reading (which is really hard to do in Arma 3).

It means you can't really trust the Kestrel 4500 to measure the actual Wind Speed coz the Kestrel 4500 only measure the Uprange Wind :(

Kestrel 4500 can't measure the Downrange Wind. So You also gotta pay attention to the Wind Arrow & the Mirage to measure the actual Downrange Wind. It's really hard to read them but if you practice a lot, you'll get the hang of it ;)


Sometimes Uprange Wind could be equally the same as the Downrange Wind, but only when the map contour is perfectly flat (not mountainous at all)! If you're shooting in a mountainous area, the Uprange Wind & the Downrange Wind will always be different so be careful.


When you do this “Quick Windage Formula”, you gotta remember that Wind Direction will also affect the FINAL VALUE of the overall Wind Speed just like in this picture!


1yBuI1U1k0JobbO8gfG81GprBaMsq9hg2rGmxPv-


Yes, the Direction in which the wind comes from will affect the Final Wind Value to be used in the Windage Formula:

3 & 9 o'clock Full Value Wind Speed x 1.0

2, 4, 8, &10 o'clock 9/10 Value Wind Speed x 0.866

1, 5, 7, &11 o'clock 1/2 Value Wind Speed x 0.50

1:30, 4:30, 7:30, 10:30  3/4 Value Wind Speed x 0.71

6 & 12 o'clock Zero Value → Wind Speed x 0


After getting the windage, snipers use their mildot reticle to compensate for that wind drift. They're using the mildot to hold to the left or right of the target for the wind drift.

NEVER dial the scope adjutment turret for the wind drift  coz it's useless (wind is always constantly changing)!!! :( 
so always hold for the wind!!!


It's something that military snipers call Kentucky Windage → practice of aiming to one side of the target to adjust for wind, rather than adjusting the gun's sights


For example:
you're shooting M24 SWS rifle loaded with M118LR ammo (BC = 0.485 (G1)). Wind blows 12 mph from the Left (9 o'clock) to the Right. Your target is at 600 m away from you. What's your windage? :/

Windage (Mil) = Wind Speed (mph) / BC 1st decimal number X Target Range (converted to 0.xxx Mil)
Windage (Mil) = 12 mph / 4 X 0.600 Mil
Windage (Mil) = 1.8 Mil to the Right of your target

so to compensate for that wind, you hold 1.8 Miliradian into the direction in which the wind comes from (you hold 1.8 Miliradian to the left of your target just like in the picture below).


NDP_f8cbX6AwSOVXhrcGQ1NxCKq5aliVSuG5B7ts


Never dial-in for the wind drift! You always have to hold into the direction in which the wind comes from (just like in the picture above)!


This formula can be used for 5.56 mm ammo (with a BC of .3xx) using 3 mph window (adding 0.1 mil at 500 m and beyond).
This formula can be used for 300 Win Mag ammo (with a BC of .5xx) using 5 mph window (adding 0.1 mil at 700 m and beyond)
This formula can be used for 338 Lapua Mag (with a BC of .6xx) using 6 mph window (adding 0.1 mil at 800 m and beyond) and so on.

this technique is best to hold off for the wind especially when wind is changing like crazy 
Give this a try, it'll get your shot 100% dead on the target! i tried it in this game & it surprisingly works! 


---------------------------------------------------------------------------------------------------------------------------------------------------------------------------------------------------------------------------------------------------------------------------------------------------------------------------------------------------------


2. Sniper Mildot Holdover

Use only your mildot reticle to compensate for bullet drop & wind drift (without dialing the scope adjustment at all)!


This technique has been used by military snipers (especially USMC, Navy Seal, & US Army) to engage multiple targets very fast. What those snipers really do in battlefield when engaging a target is actually use their mildot reticle to compensate for bullet drop & wind drift. They're using the mildot to hold over the target for the bullet drop & wind drift. They rarely dial-in on their scope adjutment turret coz it takes too long :( So they always zero (sight in) their gun at a certain distance (usually the distance where most targets show up) & use the mildot to hold for bullet drop & wind drift at other distances.


For instance:

US Army Snipers usually zero (sight in) their M24 rifles at 400 m. Let's say the target is at 800 m. So they still got bullet drop of 6 Mils down & their wind drift is 3 Mils to the left. What they do to compensate for it? They don't dial their scope adjutment turret again. Instead, they use their mildot reticle to hold 6 Mils above the target and hold 3 Mils to the right of the target.


here's the mildot holdover used by the US Army, USMC, & Navy Seals snipers


Mildot Holdover for M24/M40 & M118LR ammo (in 7.62x51 mm NATO cartridge) 

N_8ryOdh0N3dfv0-P4tK2g0EFrTKvzMw1r1IKgX9


Here's the video of Mildot Holdover for M24/M40 rifle & M118LR ammo


Mildot Holdover for MK13 mod 5 & MK248 mod 0 ammo (in 300 Winchester Magnum cartridge) 

J_6QE0q3dK_zaFEA2fw0AhlgUzaQODu10SSXwd0X


Here's the video of Mildot Holdover for MK13 mod 0 rifle & MK248 mod 0 ammo


Mildot Holdover for TAC338 / L115A3 & Blackhills Sierra 300 gr MK ammo (in 338 Lapua Magnum cartridge) 

WLEwMlEn4PWXjXIyrhJXGAqC8QusnLc6iKIuy4Gx


Here's the video of Mildot Holdover for Tac338 rifle & Blackhills Sierra 300 gr MK ammo


Mildot Holdover for MK12 mod 1 & MK262 mod 1 ammo (in 5.56x45 mm NATO cartridge) 

4YwYl8e-YGOqUs2H9Z_KdSc6BmaSQg8PphwNfske


Here's the video of Mildot Holdover for MK12 mod 1 SPR & MK262 mod 1 ammo


----------------------------------------------------------------------------------------------------------------------------------------------------------------------------------------------------------------------------------------------------------------------------------------------------


3. Sniper Milliradian Ballistic Reticle / "Christmas Tree" Reticle / BDC (Bullet Drop Compensator) Reticle


Use only your Milliradian Ballistic Reticle to compensate for bullet drop & wind drift (without dialing the scope adjustment at all)!

Milliradian Ballistic Reticle Holdover works like Mildot Holdover. In fact, it doesn't require you to sight-in your scope at any particular range at all! 

You just completely hold over the target using the Milliradian Grids. Yup, those Grids represent the Milliradians!


Here are the examples of Milliradian Ballistic Reticles made by Horus Vision --> https://www.horusvision.com/


Luckily we got one Milliradian Ballistic Reticles (which is the Horus H58 Reticle) included in Red Hammer Studio weapon mod ^_^

The Reticle is used in their Leupold Mark 4 ER/T 6.5-20X50mm M5.


Here's the tutorial on how to use Horus H58 Reticle --> https://horusvision.wordpress.com/2011/04/15/how-to-use-the-h58-reticle-by-todd-hodnett/


Here's the picture of Horus H58 Reticle


CONNs_SJLiRQ4cE4MZVGm78mD44ydLsmOta9yC23


Here's a video demonstrating the effectiveness of Horus H58 Reticle!


Good shooting!

-Best Sniper Simulator-

Share this post


Link to post
Share on other sites

Some players have been wondering how to get all the Ammo Ballistics Data (BC, MV, etc). 


There are 3 ways to do it:


1. You have to contact & ask the mod author of the weapon mods you're using! 


Here's some of the ammo ballistics data from ACE3 Team & Dagger (the author of "Dagger Weapon" mod):


https://github.com/acemod/ACE3/blob/master/addons/ballistics/CfgAmmo.hpp


Military Ammo Specification (from Dagger mod)

tCwJnsTALjNaczC2021EP5tCEVFnVEJqECoRZSok


Just download the picture to enlarge the table!


2. You can use AtragMX Truing Tool


https://ace3mod.com/wiki/feature/atragmx.html#33-example-with-truing-tool


Start of the mission:

  • Select Drag Coef Table in the Options menu.
  • Add the ZR and the C1 (Gun column) in the table and Done.

In position:

  • Open the Truing Drop in the Options menu. [Manual]
  • Add the actual Target Range in the SUPER column and Calc.
  • Add the same Target Range in the SUB column and Calc.
  • Apply the actual scope elevation (your actual bullet drop) in the Drop field and Calc.
  • Accept the new C1, Gun column and Elev are updated.
  • The Drag Coefficient Table will be automatically updated. [Manual]
  • Optionally, Save Gun and Done in the GunList.


4EGaTOkFZPRqXV_pMFmPdwzT2QwoiaiY1W2wmDUI


  • AtragMX is also able to use Multiple BC's calculation (you can add couple of different G1 BC's at certain range). Just select Drag Coef Table in the Options menu, plug-in all your BC's, and click Done.
  • The ballistic coefficient C1 and the elevation Elev will be recalculated.


_Xbdg7p5hmzOqpcfiKM0RTQw73OhzlmRQWjSNwAK


dp_w-x-mMEt-NpMWheJqlz6IMxwwQ1_fqYlFL7dx


3. You can use the EDEN editor on ARMA 3

You can find the Ballistics data of any bullet by using the EDEN editor on ARMA 3: configfile » “CfgAmmo” » “Range card cartridge” » “ACE_ballisticCoefficients” configfile » “CfgAmmo” » “Range card cartridge” » “ACE_dragModel”. 

Just use the config file viewer in the EDEN Editor. Which I think that would be helpful for pulling up information on Bullets.

Share this post


Link to post
Share on other sites

Hi guys, here's another advanced military sniper trick or method that you can use to snipe in Arma 3 (with ACE3 mod of course). it's called "Quick Angle Shooting" technique (made by Todd Hodnett)

This technique can be used to shoot high & low angles. This is very useful when we're engaging multiple targets fast (without using any ballistics calculator) and this technique really suits the Sniper Mildot Holdover technique (which i described earlier in my previous post).


We all know that when we're shooting with a high or low angle (non-flat firing position), our shot trajectory will become flatter (which means bullet drop becomes less) and our normal firing solution will get the bullet flying higher off the target.

So we gotta reduce/subtract our normal Mildot Holdover a lil bit!
here's the Three easy rules:
30 degrees angle = subtract 0.5 MOA or 0.15 Mil every 100 m from your normal mildot hold
• 45 degrees angle = subtract 1 MOA or 0.3 Mil every 100 m from your normal mildot hold
• 60 degrees angle = subtract 2 MOA or 0.6 Mil every 100 m from your normal mildot hold and then add 1 MOA or 0.3 mil back to the hold


(This formula works really well for .308 cal rifles!)


For instance:

Target Range is 500 m. You're shooting M24 SWS rifle with M118LR ammo (.308 cal, 175 gr, 795 mps, 0.485 G1 BC, 1012 hPa pressure, 20°C temperature, 100 m Zero Range).
Your normal Bullet Drop (with flat shooting position) will be 3.6 Mil . But you're shooting high or low angles, so these what you're gonna have to do.
For 30 degrees angle we take that 3.6 mils, then subtract 0.75 mil (0.15 mil x 5), so the real bullet drop is 2.85 mils 
For 45 degrees angle we take the 3.6 mils, then subtract 1.5 mils (0.3 mil x 5), so the real bullet drop is 2.1 mils
For 60 degrees angle we take the 3.6 mils, then subtract 2.7 mils (0.6 mil x 5, then add 0.3 mil back), so the real bullet drop is 0.9 mil


so all you gotta do is just figure out all the mildot hold substraction for all the angles at all distances. Then you can incorporate it into your Mildot Holdover.


-----------------------------------------------------------------------------------------------------------------------------------------------------------------------------------------------------------------------------------------------------------------------------------------------------------------


Or if you find that Todd Hodnett's Quick Angle technique really confusing, perhaps you can just try this Old School formula:


Angle Cos (α°) x the normal Firing Solution at that range


but you're always gonna have to bring a Cosinus Table to use this old formula lol XD so this formula ain't so good for fast target engagement.

And most of the time, this old school formula ain't really spot on too :(

So i prefer using Todd Hodnett's Quick Angle technique....


i really hope this will help you guys become a better shooter/sniper in Arma 3 (with ACE3 mod of course). 


Good shooting! ^_^

-Best Sniper Simulator-


p.s.: How do we know our shooting angle? :/ Well just measure it with the ACE3 Protractor (click “Left CTRL + Left Shift + K” key) ^_^

Share this post


Link to post
Share on other sites

Some people have been asking me how to hit Moving/Running Target.

My answer is: snipers tend to prefer shooting a non-moving target. Shooting a moving target is a very hard job to do and it requires luck! That's why snipers usually pick a target that doesn't move too much. Or if the target's moving, sniper will wait till the target stops moving and then take the shot.


But if you still gotta hit a moving target or a running target, then what you're gonna have to do is Lead the Target (having a discrepancy / distance between the Running Target and your Point of Aim/Point of Impact).

So you have to release the shot when the running target reaches the Lead point (he hasn't reached your Point of Aim/Point of Impact)!!!


Let's say your Point of Aim/Point of Impact is the Center of the Reticle. You have a running target. To lead the target, you're not gonna shoot the target when he's in the Center of the Reticle.

Instead, you're gonna have to shoot him before he reaches the Center of the Reticle!


There are 3 techniques of shooting a moving target:


1) "Stop & Go" → The sniper will center his crosshair as close as possible on the moving target. When the target finally stops moving, the sniper fires. This is the most recommended technique!


giphy.gif   giphy.gif


2) "Tracking" → The sniper will track the moving target with his crosshair placed ahead of the target (having a Lead between target and crosshairs / aiming mark). This require shooter's body, crosshair, and weapon to move to follow the target during the shot. 


giphy.gif   giphy.gif


3) "Ambush" → The sniper will place the crosshair ahead of the moving target, he will remain stationary until the target walks / runs to a predetermined point (Lead point). The rifle is fired when the target reaches the Lead point, then the target will "walk or run" into the bullet.


giphy.gif  giphy.gif  giphy.gif


how do we know how much Lead we need?

To determine how much Lead we need, we need to consider 3 things:

1) Time of Flight of the Bullet

2) Speed of the Moving Target → this is the most challenging part!

3) DIrection / Angle that the target is moving relative to the shooter's line of sight


You gotta find it out with your Ballistics Calculator (AtragMX in ACE3)!

Plug the Target Speed & Direction in the “Target” tab in the AtragMX. It'll tell you how much Lead you need to shoot the running target. 


if you really can't use any Ballistics Calculator, then you can use this old school formula to calculate Lead for moving targets:


Lead (in Miliradian) = (Bullet Time Of Flight (in seconds) x Target Speed (in mph) x 447 ) / Range (in meter)


here's an example of shooting moving target in Arma 3!


shooting a target in his moving car (shoot through the windshield)


shooting moving target with the Mildot Holdover technique


shooting moving target with the Scope Adjustment Dial technique


shooting moving target with the Miliradian Ballistic Reticle (Horus H58 Reticle) 


------------------------------------------------------------------------------------------------------------------------------------------------------------------------------------------------------------------------------------------------------------------------------------------------------------------------------------------------------------------------


As we all can see, a sniper is very accurate even when shooting moving/running targets.

So the question is can we ever run away from sniper? How to evade / dodge sniper shot?

Let's say your Platoon is walking on a patrol and all the sudden there's a sniper shooting at your Platoon. How to avoid getting shot by a Sniper?


Here's a video showing you couple of things you can try to do to survive a sniper shot (hopefully if you're luckier than the sniper who hunts you) ^_^


To summarize the video, let me tell you the tricks to avoid getting killed by a sniper:


1. Don't Just Stand Still / remain in your place

the sniper will easily aim at your center mass and kill you! Standing still will increase the sniper's hit probability. He can hit your head, upper torso, lower torso, legs, etc :(


2. Don't Just Kneel / Crouch & Stay Still!!!
Kneeling / Crouching will only decrease sniper's hit probability very slightly. He can still easily hit your center mass (torso)!


3. Don't Just Lie Prone & Stay Still!!!
Okay, Lying Prone will help you decrease the sniper's hit probability. But remember, he can still hit small part of your body and easily kill you. You're still making yourself a sitting duck.


4. Don't Just Go Prone & Crawl Through The Sniper's Killzone!!!
Crawling on the ground won't help you! The sniper can still hit small part of your body and easily kill you.


5. You Can't Just Run Fast Through The Sniper's Killzone!!!
Okay, running fast will help you dodge the bullet. But a great sniper is very good at shooting a running target!


6. Don't Just Walk Casually Through The Sniper's Killzone!!!
Even running fast will still get you killed! Walking slowly into the sniper's killzone is obviosly a much easier way to die.


7. Don't Just Walk Toward The Sniper's Line Of Sight!!!
Don't come closer to the sniper! You'll just make it very easy for the sniper to kill you.


8. You Can Hide Behind A Cover But Make Sure The Cover Is Solid Enough!!!
The sniper can shoot through your thin cover if his rifle shoots big cartridge. Big caliber bullet can even punch through steel material!


9. You Can Use Some Hostage As A Human Shield But Make Sure All Parts Of Your Body Are Fully Covered By The Hostage!!! lol XD
This method is mostly used by terrorists & robbers to cover their asses off from snipers. Unfortunately, despite hiding behide the hostage, their heads usually still stick out so badly. Remember, a great sniper can still shoot you in the head without hurting the hostage at all :)


10. You Can Drive A Car & Step On The Gas!!! 
But remember, a great sniper can still shoot you through the car windshield! The glass of the windshield can deflect the projectile but it doesn't stop the projectile from hitting you! 


11. Get Inside A Heavy Armoured Vehicle (Like Tanks)!!!
This is hands down the best & the safest way to evade / dodge a sniper shot! Once you're inside a Tank, the sniper can't shoot you at all! In fact, now you're the one who got the power to blast off that bloody sniper with your Tank Canon! It's the only way to defeat a sniper! :)


-------------------------------------------------------------------------------------------------------------------------------------------------------------------------------------------------------------------------------------------------------------------------------------------------------------------------------------------------------------------


Okay, let's say you're getting shot at by a sniper and you manage to stay alive and start thinking on how to counter-attack the sniper.

First thing you're gonna have to do is know How To Locate The Hidden Sniper!


There's an old school method used by the USMC Scout Sniper. The method is called "Crack-Boom" technique. Here's how it works:

When you're under fire and the sniper's bullet flies passing you by, you will hear the sound of its Supersonic "Crack Boom". 

The "Crack" sound is the sound of the projectile flying through the air around you (It sounds exactly just like the crack of a Bullwhip). That "Crack" sound will be followed by a "Boom" sound afterward. 

The "Boom" sound is the sound of the actual sniper's gun fire. There will be time discrepency / time delay between the "Crack" sound and the "Boom" sound. 

When you hear a "Crack", you start counting really fast "1, 2, 3, so on" and stop the counting whenever you hear the "Boom".


If the counting stops at 1, it means the sniper is 100 meter away from you!

If the counting stops at 2, it means the sniper is 200 meter away from you!

If the counting stops at 3, it means the sniper is 300 meter away from you!

And so on!


When you already know the sniper distance / range, you carefully start scanning all the areas within that range.


You can estimate the direction of the shot by hearing the "Boom" sound.

The "Boom" sound will show you where the gun fire comes from.


Share this post


Link to post
Share on other sites

Sometimes a sniper doesn't have the time to pick up his Laser Range Finder and lase the target :(

Especially when he has to shoot multiple targets really fast. Or when his Laser Range Finder is out of battery.


So how to measure Target Distance without using a Laser Range Finder? We gotta use an old sniper technique called "Mil-Range the Target"

This technique is really good to be used for Mildot Holdover shooting :)


here's the quick formula:


0enQgUaXPMu-JNKeMoHFPNZ7dNMwxvMaUtev6UmV


For example:

in the picture below, the target (6 feet or 1.8 meter tall) is about 3 Mil in our scope.

So the Distance is about:

Target Distance = Target Real Size (in Meter) x 1000 / Target Size in Scope (in Miliradian)

Target Distance = 1.8 m x 1000 / 3

Target Distance = 1800 / 3

Target Distance = 600 meter 


JcWoCotcG7cf2GrNSrFY8GfZk4OY8NTt32q9q4UN


Share this post


Link to post
Share on other sites
On 25/10/2017 at 12:42 AM, quickdagger said:

Nice work man!

Keep it up!


Thank you so much, Dagger!

Omg i'm the biggest fan of your Mods, dude! Your Weapon mod has the most accurate rifles i've ever shot in this simulator! :o 

I literally never miss when i'm shooting your rifles coz their shot dipersions are really small. They got very tight shot-group size (some people might find them a lil bit overpowered) but i actually kinda love it! it's sniper's paradise!


you're the best weapon modder, bro! Keep up the good work!

looking forward to your next work! ;)


----------------------------------------------------------------------------------------------------------------------------------------------------------------------------------------------------------------------------------------------------------------------------------------------------------------------------------------------------------------------------------


Alright guys, let me explain a lil bit about Fundamentals of real Long Range Precision Shooting / Sniping 

These things i'm about to say might sound really weird or hard to digest. But believe me, these things are for real especially when you wanna become a real sniper ;)


There are 2 insanely important things that a sniper has to take care about:

1) Precision refers to the spread of individual shots about the center point of a shot group. A precise shooting system will (over many shots to and from the same points) produce a tight shot group with smaller distances between individual shots than a less precise system. However in contrast to accuracy, precision can't be "adjusted" into a shooting system by dialing some knob on the weapon.

2) Accuracy refers to how well shot groups are centered on a target, and is essentially a problem of sighting-in a shooting system. If the shot group doesn’t center on the desired target the assumption is that the weapon merely needs to have its point of aim adjusted by dialing some knob on the weapon.


nEydLzQapxjXSJvHBGQ9OiB5oolLPI8J5KDVQDIN

Precision isn’t the same with Accuracy!!!


uHZg6LDCiqq7YwOWM2QnnY6gilKaxokPEclOQ8Jc


What is Precision & What affects it? → http://www.ballistipedia.com/index.php?title=What_is_Precision%3F


A) INTERNAL BALLISTICS (that affects Precision) → what happens inside of the firearm which affects how tight your shot-group / shot dispersion size (spread of individual shots around the center Point of Impact) will be...


1) SHOOTER PRECISION (Stability & Consistency of shooter when pulling the trigger) → shooting position must be extremely stable and you must achieve NATURAL POINT OF AIM to prevent any movement of the rifle during the trigger release which can cause the shots to disperse.


1. There are 5 different shooting stances to be considered. Prone, sitting, standing, rested, and bench rested. The best and the most tactical stance for military snipers is definitely Prone. So Go prone and stretch both legs wide open!

bOWksQCxxdZiwqxlw--fmSYTLVWhAIbwuBgVfkTc


2. Make sure your body and your rifle are in straight line directly to the target! Put the rifle buttstock on your Shoulder Pocket (make sure it touches your pocket shoulder perfectly). Make sure your rifle is perpendicular to your Shoulder Pocket!

 giphy.gif            CcXrA8xi_ot8ZcbP8PL1ubOXi-fxGQ4ztGl0q3y9


3. Load the bipod and give a little pressure on it by pushing the rifle a bit to it!

giphy.gif


4. Place your rifle buttstock on the Rearbag to stabilize it.

rMf7ukvs2FyldAb8FLOsqrfdR_dkA3XYKWEOCrnJ


5. Rest your cheek slowly on the Cheek Weld (like you’re going to sleep) and relax!

JOSavfLW2S5zwAPMTA4TUAooPNXVQtPOGxTIbmRv


6. Open both eyes behind the scope and see scope view to check if the Eye Relief is already spot on on not (if the scope view is still blurry and still got some black shadow, then you gotta reset scope position)

VuMPPVjspHsfutfquUcYNfNAgJ2mN-t2TU29yllR


7. Focus on the reticle and nod/shake your head. Check if the reticle is still floating & moving around inside the scope (this is called “Paralax Error”). If it still happens, you gotta reset the Paralax Adjustment Knob until the Reticle stays put in the middle of the scope.

HgE4aM5tJAoqgDupnO2uyHb8sEQ8GMi4oVLw4n4h          RM38aaRxHBKhTExtnLSrAnMSXNh8AQG1Dj8yRg3S


8. Check your Scope Cant! Make sure your scope & rifle are NEVER canted while taking a shot coz it’ll throw your shot off horizontally as if it is a windage error. Always make sure that your scope is completeley leveled! Pro snipers use some scope bubble to check if his loadout is canted or not.


The Explanation of Scope Canting Error → http://www.accurateshooter.com/optics/canting-effect-on-point-of-impact/

jEOirvzLR5m6EHoHRUtMJjRDyXFPwxyYx_fMQl3M      giphy.gif   


9. Start doing Breath Control! Take some very deep breath and exhale very very slowly! Do it couple of times to lower your heart beat. You don’t need to hold your breath for too long when taking a shot!

0sdS8VDcSNVI7oBeh_fDyS3sgqgZ5_iOjei-4cNs


10. Sight the gun to the exact same point each shot. Hold your sights absolutely steady. Release the trigger at the point that the sight is crossing the desired POA. You can dial in all the bullet drop & windage on the scope adjutment knob or you can just do Mildot Holdover.

giphy.gif


11. Always do Trigger Control while pulling the trigger before a shot. Use your Index Finger only (make sure no other fingers or other parts of your body are moving). Only your Index Finger which moves pulling the trigger, anything else has to freeze! Pull the trigger really gently and slowly, don’t jerk the trigger!!!

yl0EEJk0Yk-_a4bjppmynvN1-YLpJcwbaLC9Mzmw    giphy.gif  8NM9kImwSACsycMid2Cpdu9nK6fGuA3BrKHAete9


12. When the rifle finally explodes and shoots, it’ll kick you back with the recoil. Don’t flinch or startle at all!!!

giphy.gif


How to Shoot Like a Marine Scout Sniper


2) SCOPE PRECISION → make sure you pick some nice quality scope which has this criteria:

1. High Quality & Crystal Clear Lens

2. Lens Size → More light is always better, so it makes sense that a larger Objective Lens would be able to gather more light than a smaller one. Big Tube Diameter for higher Elevation & Windage adjustment range.

3. First/Front Focal Plane à On front focal plane scopes, when you adjust the zoom on the scope the reticle will appear to change size. When you zoom in it will get bigger, when you zoom out it will get smaller.

4. Coated Lens for fogproof & waterproof and reduce glare

5. Zoom Range/Power

6. Huge Field of View

7. Eye Relief

8. Paralax Adjustment

9. Make sure the Reticle matches the Adjustment Knob

10. Miliradian/MoA based Reticle

11. Adjustment Angular Unit → Miliradian or Minute of Angle

12. Adjustment Grad  → 0.1 Miliradian per click or 0.25 MoA per click

13. Adjustment Correction → make sure the Adjustment Knob is 100% true! So when you dial 1.0 Mil, it’s really 1.0 Mil not 0.98 Mil!

14. Don’t forget to zero the scope at certain range (most shooters prefer 100 m)


3) RIFLE PRECISION (Stability & Consistency of the rifle in delivering projectile to the target) → the Rifle gotta have good Rifle Vibration / Rifle Harmonics to achieve tight shot group (small bullet dispersion).

Choose a Cartridge that fits your need!

Choose the Rifle Action that fits your need → Bolt Action or Semi Auto, etc


1. Barrel Vibration / Barrel Harmonic / Barrel Whip & Barrel Stiffness → Barrel has to be heavy, stiff, & rigid in oder to have very tight vibration/harmonic/whip when the rifle fires the projectile! The heavier & stiffer the barrel is, the less the barrel vibrates, the more precision it has!


a. Barrel Material → Stainless steel, Chrome Moly, Chrome Lined

Chrome Moly = cheapest, lightest, pretty stiff, decent accuracy, shorter life
Chrome lined = best for high round count and rapid fire, not so stiff, less accurate
Stainless steel = very stiff, high accuracy, high round count

https://www.joefirearms.com/chrome-lined-chromoly-and-stainless-steel-barrels/


b. Barrel Shape or Barrel Contour → Straight Cylinder, Straight Tapered/ Match Heavy Barrel / Tactical Contour, Palma, Sporter, etc


ddvfWMp1tLQpR87htUZu3lyqa2Ze-GD-cSvd_qDQ---> Benchrest Shooters use this coz this is the heaviest & stiffest!

g12TVB8kR8QnKhMkOLGoad85kv7oArgYBF5r51Nt--> Military Snipers use this coz this is not too heavy but still stiff as hell!


68HFgtg9fijgJJVeDM6_Lbr0VtIlmhCk7-3oyRLk-> Hunters & Recreational Shooters use this coz this is not heavy!


PkA9c9PmxNBTozM0eCmuDBOZQUlFQwASgQzPHZlT-> Hunters & Recreational Shooters use this coz this is the lightest & the least stiff!


c. Barrel Dimension → Barrel Overall Length, Length & Diameter of Cylinder (Chamber Room), Length & Diameter of Muzzle, Diameter of Bullet & Bore, Land & Groove profile (Number & Width), Rifling Twist Rate & Direction, Barrel Flutes profile (Number, Width, Length, Depth)


d. Barrel Mass → The heavier the barrel, the stiffer the barrel is!


Here's the calculation to estimate Barrel Mass & Stiffness based on its Material, Shape/Contour, & Dimension  →  http://riflebarrels.com/barrel-weight-calculations-for-contoured-barrels/


2) Barrel Lifehttp://precisionrifleblog.com/2012/07/09/practical-tips-to-extend-barrel-life/


3) Optimal Barrel Timehttp://www.the-long-family.com/shock wave theory summary explanation.pdf ; http://www.the-long-family.com/OBT Table.pdf


4) Firearm Action → https://en.wikipedia.org/wiki/Action_(firearms)


The best Firearm Action for a sniper (which offers the best precision) is obviously Bolt Action!!! Why???

Because in a Bolt Action rifle, the only moving parts when firing are the Pin and Spring. Since it has fewer moving parts and a short lock time, it has less of a chance of being thrown off target and/or malfunctioning.

When you pull the trigger, the Firing Pin strikes the Primer and that is the last mechanical thing moving. There are no other mechanical actions taking place. Just the powder burning, the gas expanding, and the bullet being pushed out the end of the muzzle. This makes Bolt Action the most stable & the most consistent Firearm Action ever made by mankind! Bolt actions are also easier to operate from a prone position. 


Bolt-action firearms can theoretically achieve higher muzzle velocity and therefore have more accuracy than semi-automatic rifles because of the way the barrel is sealed. In a semi-automatic rifle, some of the energy from the charge is directed towards ejecting the spent shell and loading a new cartridge into the chamber. In a bolt action, the shooter performs this action by manually operating the bolt, allowing the chamber to be better sealed during firing, so that much more of the energy from the expanding gas can be directed forward. The bolt action's locking lugs are normally at the front of the breech (some designs have additional "safety lugs" at the rear), and this increases potential accuracy 


There are 3 major turn-bolt action designs: the Mauser system, the Lee–Enfield system, and the Mosin–Nagant system. All three differ in the way the bolt fits into the receiver, how the bolt rotates as it is being operated, the number of locking lugs holding the bolt in place as the gun is fired, and whether the action is cocked on the opening of the bolt (as in the Mauser system) or the closing of the bolt (as in the Lee–Enfield system). The vast majority of bolt-action rifles utilize one of these three systems, with other designs seeing only limited use.


Remington 700 Action (which is a Mauser bolt action system)  

giphy.gif

It features "Cock On Opening", meaning the upward rotation of the bolt when the rifle is opened cocks the firing pin (there's a Cam mechanism pushing the Cocking Piece of the Firing Pin backward)


Lee Enfield bolt action system

giphy.gif

It features "Cock On Closing", meaning the forward thrust of the bolt when the rifle is closed cocks the firing pin (the Sear holds the Cocking Piece while the forward thrust of the bolt keeps pushing & pressing the Firing Pin Spring)


Mosin Nagant bolt action system

giphy.gif

It has a separate bolthead which rotates with the bolt and the bearing lugs, in contrast to the Mauser system where the bolthead is a non-removable part of the bolt. The Mosin–Nagant is also unlike the Lee–Enfield system where the bolthead remains stationary and the bolt body itself rotates.


In a Semi-Auto, there are a bunch of things that happen which are necessary to create the 'semi-automatic reloading' action of the firearm.  It is possible to tune these activities so they minimize their impact to accuracy, but it is not possible to tune them to as high a degree as they would be in a bolt action because you can't make them hold still.

To a certain degree, tuning to make them highly accurate impairs their reliable function (i.e. make them so they don't wiggle as much and then they don't move as freely).  The most highly tuned semi-autos are really only used for target competition, where the operating conditions are more controlled - not for hunting / police / military work.

With a semi-automatic rifle, the bolt carrier rocks back when the shot breaks, While this is necessary to cause the reload action, it means that a heavy piece of metal moves back in the rifle, causing the center of gravity to shift ever so slightly. Worst case, at this point the bullet may not have cleared the muzzle yet - which means that the shift will cause the muzzle to move a tiny bit, which in turn will affect the flight path of the bullet.

Given the extreme ranges sniper rifles are used at, even a move a fraction of a degree will have big consequences.

Semi-auto also has some problem with Barrel Harmonics.  It's very rare for a semi-automatic rifle to have a free-floating barrel, because there must be gas tubes or gas pistons attached to the rifle to function the weapon.  This causes the barrel to resonate at a different frequency than it would naturally.  Any thing attached to the barrel will also cause a mechanical pressure on the barrel.  Variances in this pressure will cause inconsistencies in accuracy.


5) Trigger → https://en.wikipedia.org/wiki/Trigger_(firearms)   http://precisionrifleblog.com/2015/12/06/best-rifle-trigger/


6) Tactical Stock → Free Float Barrel & Stock  (make sure the barrel doesn’t touch the Stock)!


7) Rifle Bedding → Fill the gaps between the Action & the Stock. https://en.wikipedia.org/wiki/Rifle_bedding


8) Solid & comfortable Stock


9) Bipod


10) Muzzle Brake


12) Suppressor


4) AMMO PRECISION (Stability & Consistency of the ammo cartridge to deliver consistent Muzzle Velocity from shot to shot) → the ammo cartridge gotta have stable and consistent muzzle velocity (with very small variation in each shot) to achieve tight shot group (small bullet dispersion).  


To know how good an ammo really is, I usually use QuickLOAD (an Internal Ballistics predictor / Computer Program for firearms) → http://www.neconos.com/details3.htm


All these parameters must be entered into QuickLOAD for calculating an estimated data on how well the ammo will perform:

1. Cartridge

2. Projectile

3. Caliber/Diameter                                           

4. Projectile Mass     

5. Projectile Length

6. Ballistics Coefficients (G1 or G7)

7. Projectile Stability

8. Primer     

9. Case

10. Case length & Max Case capacity

11. Cartridge Overall Length

12. Projectile Seating Depth

13. Powder Brand

14. Min & Max Powder Charge     

15. Min & Max Chamber Pressure

16. Optimal Charge Weight (correspond to its Optimal Barrel Time)

17. Case Filling / Loading Ratio

18. Useable Case Capacity

19. Optimal Muzzle Velocity (correspond to its Optimal Charge Weight)      

20. Muzzle Velocity Shift (due to Air Temperature & Powder Burn Rate)

21. Muzzle Velocity per added Barrel Length     

22. Muzzle Velocity Standard Deviation (in every shot)

23. BC Error (in every shot)


The QuickLOAD will help us analyze if a particular Ammo Handload has a good Chamber Pressure, Muzzle Velocity Consistency, Optimal Barrel Time, Optimal Powder Charge Weight, & Optimal Muzzle Velocity. 


http://www.the-long-family.com/shock wave theory summary explanation.pdf

http://www.the-long-family.com/OBT Table.pdf

http://www.frfrogspad.com/loaddev.htm

http://www.frfrogspad.com/intballi.htm


B) EXTERNAL BALLISTICS (that affects Accuracy) → what happens during the bullet's flight which affects how well your shot-groups are centered on a target (the discrepancy between Point of Aim and Point of Impact)


1) ATMOSPHERIC CONDITION

- Air Pressure  → The thicker the air (higher air pressure),  the more your bullet will drop. The thinner the air (lower air pressure), the less your bullet will drop.   

- Air Temperature → The cooler the air,  the more your bullet will drop. The hotter the air, the less your bullet will drop. Air temperature also greatly affects the Internal Ballistics (it affects powder burn rate which shifts your Muzzle Velocity)

- Relative Humidity → more humidity, less bullet drop


2) TARGET DATA

- Target Range     

- Target Movement Speed

- Angle of Firingless bullet drop when you’re shooting at an angle

- Latitude & Azimuth → for calculating Coriolis Effect

- Wind Direction & Wind Speed (sometimes you’ll have multiple winds: Uprange Wind & Downrange Wind)


3) FIRING SOLUTION

- Elevation (Bullet Drop & Vertical Coriolis Effect) → the up-down adjustment of a gun sight used to change the vertical component of the aiming point (in Miliradian or Minute of Angle)

- Spin Drift (including Horizontal Coriolis) → side-to-side adjustment of a gun sight used to for horizontal drift caused by gyroscopic effect of the spinning bullet (in Miliradian or Minute of Angle)

- Windage / Wind Drift → side-to-side adjustment of a gun sight used to change the horizontal component of the aiming point (in Miliradian or Minute of Angle)    

- Hit Probability  → chance of the weapon system to hit the target (x% outta 100 shots)


  • Like 1

Share this post


Link to post
Share on other sites

Hei man!

Oh thank you man! I am just a humble modder out there!

Come and join us on the ACE discussions as deadmen told you!

All of the best dude!

  • Like 1

Share this post


Link to post
Share on other sites
On 30/10/2017 at 3:45 AM, quickdagger said:

Hei man!

Oh thank you man! I am just a humble modder out there!

Come and join us on the ACE discussions as deadmen told you!

All of the best dude!


absolutely love to join you and the ACE team on Slack discussion :D

How to join? just give my email to Slack and they'll send me an invitation?

Share this post


Link to post
Share on other sites
7 hours ago, CioBAbba said:

why i can't see those pictures?

Because the original thread is over 3 years old! I imagine the original host has gone down or the images hosted there have been renamed, moved or been removed...

Share this post


Link to post
Share on other sites

Please sign in to comment

You will be able to leave a comment after signing in


Sign In Now

×